Showing posts with label Project 1. Show all posts

Monday, May 6, 2013

Configuring Windows hosts with Nagios 3.5 - Part 2


OK , now one part is done of the process and what we have to do now is installing the windows host.It can be done through the following steps.
  1. Install NSClient++ on the remote windows server
  2. Modify the NSClient++ Service
  3. Modify the NSC.ini
  4. Start the NSClient++ Service


1. Install NSClient++ on the remote windows server

Download NSCP version you prefer (I have used NSClient++ 0.3.1) from http://www.nsclient.org/nscp/downloads  NSClient++ is an open source windows service that allows performance metrics to be gathered by Nagios for windows services. Go through the installation steps to get the installation completed.


In the setup include all the plugins you want to be installed and select default location for the install.


2. Modify the NSClient++ Service

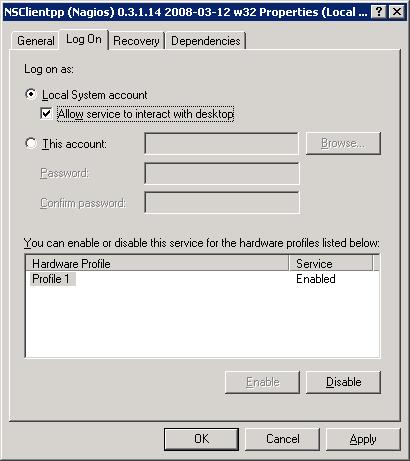
Go to Control Panel -> Administrative Tools -> Services. Double click on the “NSClientpp (Nagios) 0.3.1.14 2008-03-12 w32″ service and select the check-box that says “Allow service to interact with desktop” as shown below.


3. Modify the NSC.ini

(1) Modify NSC.ini and uncomment *.dll: Edit the C:\Program Files\NSClient++\NSC.ini file and uncomment everything under [modules] except RemoteConfiguration.dll and CheckWMI.dll

[modules]
;# NSCLIENT++ MODULES
;# A list with DLLs to load at startup.
;  You will need to enable some of these for NSClient++ to work.
; ! ! ! ! ! ! ! ! ! ! ! ! ! ! ! ! ! ! ! ! ! ! ! ! ! ! ! ! ! ! ! ! !
; *                                                               *
; * N O T I C E ! ! ! - Y O U   H A V E   T O   E D I T   T H I S *
; *                                                               *
; ! ! ! ! ! ! ! ! ! ! ! ! ! ! ! ! ! ! ! ! ! ! ! ! ! ! ! ! ! ! ! ! !
FileLogger.dll
CheckSystem.dll
CheckDisk.dll
NSClientListener.dll
NRPEListener.dll
SysTray.dll
CheckEventLog.dll
CheckHelpers.dll
;CheckWMI.dll
;
; RemoteConfiguration IS AN EXTREM EARLY IDEA SO DONT USE FOR PRODUCTION ENVIROMNEMTS!
;RemoteConfiguration.dll
; NSCA Agent is a new beta module use with care!
NSCAAgent.dll
; LUA script module used to write your own "check deamon" (sort of) early beta.
LUAScript.dll
; Script to check external scripts and/or internal aliases, early beta.
CheckExternalScripts.dll
; Check other hosts through NRPE extreme beta and probably a bit dangerous! :)
NRPEClient.dll

(2) Modify NSC.ini and uncomment allowed_hosts. Edit the C:\Program Files\NSClient++\NSC.ini file and Uncomment allowed_host under settings and add the ip-address of the nagios-server.

;# ALLOWED HOST ADDRESSES
;  This is a comma-delimited list of IP address of hosts that are allowed to talk to the all daemons.
;  If leave this blank anyone can access the deamon remotly (NSClient still requires a valid password).
;  The syntax is host or ip/mask so 192.168.0.0/24 will allow anyone on that subnet access
allowed_hosts=192.168.1.2/255.255.255.0


Note: allowed_host is located under [Settings], [NSClient] and [NRPE] section. Make sure to change allowed_host under [Settings] for this purpose.

(3) Modify NSC.ini and uncomment port. Edit the C:\Program Files\NSClient++\NSC.ini file and uncomment the port# under [NSClient] section


;# NSCLIENT PORT NUMBER
;  This is the port the NSClientListener.dll will listen to.
port=12489

(4) Modify NSC.ini and specify password. You can also specify a password the nagios server needs to use to remotely access the NSClient++ agent.

[Settings]
;# OBFUSCATED PASSWORD
;  This is the same as the password option but here you can store the password in an obfuscated manner.
;  *NOTICE* obfuscation is *NOT* the same as encryption, someone with access to this file can still figure out the
;  password. Its just a bit harder to do it at first glance.
;obfuscated_password=Jw0KAUUdXlAAUwASDAAB
;
;# PASSWORD
;  This is the password (-s) that is required to access NSClient remotely. If you leave this blank everyone will be able to access the daemon remotly.
password=My2Secure$Password

4. Start the NSClient++ Service

Start the NSClient++ service either from the Control Panel -> Administrative tools -> Services -> Select “NSClientpp (Nagios) 0.3.1.14 2008-03-12 w32″ and click on start (or) Click on “Start -> All Programs -> NSClient++ -> Start NSClient++ (Win32) . Please note that this will start the NSClient++ as a windows service.

Later if you modify anything in the NSC.ini file, you should restart the “NSClientpp (Nagios) 0.3.1.14 2008-03-12 w32″ from the windows service.


________________________________________________________________________________

The following are the places which helped a lot to gain information on these and I owe a great THANK YOU to their original authors.

REFERENCE : 


Executing a Jar (Java Plugin) using Shell Script with Nagios 3.5


Execute a Java Nagios plug-in.


Nagios is unable to recognize the exit statements of compiled jar plug-in.  So a java plug-ins can’t be directly executed in Nagios. Shell scripts can be used to execute a Java plug-ins in Nagios. These are the steps you should follow to do that.

Step 1: Write the Nagios plug-in using Java.


  • Nagios requires an information statement and exit value.
  • But you don’t need to use exit values such as System.exit(2) in java plugin
  • Java plug-in should output those two statements as ordinary STD outputs instead of exit values.
  1.  Exit value: System.out.println(2)
  2.  Information statement: System.out.println(“CPU load is 20%”)

Step 2: Convert your java plug-in in to jar.


Step 3: Write a shell script as follows.
  1. output=`java -jar /usr/local/nagios/libexec/your_app.jar $1 $2 $3 $4 $5 $6
  2. set  `echo $output`
  3. echo $output | cut -c 3-100
  4. exit $1


Description.

Line 1: Execute the jar and take the output to a variable called ‘output’.  $1 $2 $3 $4 $5 $6 are command line arguments which should be provided to the java plug-in. When the plug-in writes those two lines (Exit value and information statement) to STD out, the variable (output) is assigned a value like ‘2 CPU load is 20%’. ‘2’ is the exit value. ‘CPU load is 20%’ is the information statement.

Line 2: Set first character to $1 variable. The first character is exit value.

Line 3: echo information statement to STD out. ‘$output | cut -c 3-100’ means we take from 3rd character to 100th character from ‘output’ variable.

Line 4: Exit from shell script using exit statement.


Step 4: Place jar and shell in /usr/local/nagios/libexec folder.

Step 5: Configure Nagios to take the shell script as a plug-in.


Notification Escalations in Nagios


Friday, May 3, 2013

Installing Nagios 3.5 on Ubuntu 12.04 with Plugins 1.4.11

Nagios is a powerful monitoring system that enables organizations to identify and resolve IT infrastructure problems before they affect critical business processes.


First launched in 1999, Nagios has grown to include thousands of projects developed by the worldwide Nagios community. Nagios is officially sponsored by Nagios Enterprises, which supports the community in a number of different ways through sales of its commercial products and services.

Nagios monitors your entire IT infrastructure to ensure systems, applications, services, and business processes are functioning properly. In the event of a failure, Nagios can alert technical staff of the problem, allowing them to begin remediation processes before outages affect business processes, end-users, or customers. With Nagios you'll never be left having to explain why a unseen infrastructure outage hurt your organization's bottom line.

This is how we installed Nagios Core 3.5 in Ubuntu 12.04 with Plugins V. 1.4.11


Step 1 : Install the necessary packages and libraries


You have to install the following packages on your Ubuntu installation before continuing.

    Apache 2
    PHP
    GCC compiler and development libraries
    GD development libraries

You can use apt-get to install these packages by running the following commands:

sudo apt-get install apache2

sudo apt-get install libapache2-mod-php5

sudo apt-get install build-essential

sudo apt-get install libgd2-xpm-dev


Step 2 : Create Account Information

Become the root user.

sudo -s

Create a new nagios user account and give it a password.

/usr/sbin/useradd -m -s /bin/bash nagios

passwd nagios

________________________________________________________________

On older Ubuntu server editions (6.01 and earlier), you will need to also add a nagios group (it's not created by default). You need not to do this step on new editions of Ubuntu.

/usr/sbin/groupadd nagios

/usr/sbin/usermod -G nagios nagios 


________________________________________________________________

Create a new nagcmd group for allowing external commands to be submitted through the web interface. Add both the nagios user and the apache user to the group.

/usr/sbin/groupadd nagcmd

/usr/sbin/usermod -a -G nagcmd nagios

/usr/sbin/usermod -a -G nagcmd www-data


Step 3 : Download Nagios and the Plugins

Create a directory for storing the downloads.

mkdir ~/downloads

cd ~/downloads


Download the source code tarballs of both Nagios and the Nagios plugins (visit http://www.nagios.org/download/ for links to the latest versions). These directions were tested with Nagios 3.5.0 and Nagios Plugins 1.4.11.

wget http://prdownloads.sourceforge.net/sourceforge/nagios/nagios-3.2.3.tar.gz

wget http://prdownloads.sourceforge.net/sourceforge/nagiosplug/nagios-plugins-1.4.11.tar.gz


________________________________________________________
If you don't have wget installed you can install it by using the command below

sudo apt-get install wget
________________________________________________________

Step 4 : Compile and Install Nagios

Extract the Nagios source code tarball.

cd ~/downloads

tar xzf nagios-3.5.0.tar.gz

cd nagios


Run the Nagios configure script, passing the name of the group you created earlier like so:

./configure --with-command-group=nagcmd

Compile the Nagios source code.
 

make all

Install binaries, init script, sample config files and set permissions on the external command directory.

make install

make install-init

make install-config

make install-commandmode


Don't start Nagios yet - there's still more that needs to be done...

Step 5 : Configure the Web Interface

Install the Nagios web config file in the Apache conf.d directory.

make install-webconf

Create a nagiosadmin account for logging into the Nagios web interface. Remember the password you assign to this account - you'll need it later.

htpasswd -c /usr/local/nagios/etc/htpasswd.users nagiosadmin

Restart Apache to make the new settings take effect.

/etc/init.d/apache2 reload

Step 6 : Compile and Install the Nagios Plugins

Extract the Nagios plugins source code tarball.

cd ~/downloads

tar xzf nagios-plugins-1.4.11.tar.gz

cd nagios-plugins-1.4.11


Compile and install the plugins.

./configure --with-nagios-user=nagios --with-nagios-group=nagios

make

make install


Step 7 : Start Nagios

Configure Nagios to automatically start when the system boots.


ln -s /etc/init.d/nagios /etc/rcS.d/S99nagios

Verify the sample Nagios configuration files.

 /usr/local/nagios/bin/nagios -v /usr/local/nagios/etc/nagios.cfg

If there are no errors, start Nagios.

/etc/init.d/nagios start

Step 8 : Login to the Web Interface

You should now be able to access the Nagios web interface at the URL below. You'll be prompted for the username (nagiosadmin) and password you specified earlier.

http://localhost/nagios/

Click on the "Service Detail" navbar link to see details of what's being monitored on your local machine. It will take a few minutes for Nagios to check all the services associated with your machine, as the checks are spread out over time.


Thursday, May 2, 2013

Shell Script to bundle Nagios (3.5) and Plugins for automated Installation.

Nagios 3.5 Notification Configuration via Postfix ( using Gmail SMTP )


What I needed was to make Nagios send Notifications to any party through SMTP using google.This task was not so easy since communicating with gmail through a linux server was requiring permissions and certifications.

Then I found this great guide by rtCamp on how to set up postfix and other needed tools to setup Gmail with sending mail through SMTP.


Now here is what I did,

First,I installed all necessary packages:

sudo apt-get install postfix mailutils libsasl2-2 ca-certificates libsasl2-modules
__________________________________________________________________
# before that I needed to get some updating to the package manager by using 
sudo apt-get update 
__________________________________________________________________ 

When installing postfix I selected  "Internet Site" from the menu and tab OK.For the FQDN use something like mail.example.com.

Then I opened the postfix config file:

/etc/postfix/main.cf
 
And Appened the following line to the end of it 

relayhost = [smtp.gmail.com]:587
smtp_sasl_auth_enable = yes
smtp_sasl_password_maps = hash:/etc/postfix/sasl_passwd
smtp_sasl_security_options = noanonymous
smtp_tls_CAfile = /etc/postfix/cacert.pem
smtp_use_tls = yes
 
Then I created a new file for storing the Gmail usename and password 
/etc/postfix/sasl_passwd

You have to add the following details to that file.
[smtp.gmail.com]:587    USERNAME@gmail.com:PASSWORD

If you want to use your Google App’s domain, you can replace @gmail.com with your @domain.com

Then I fixed permission and updated postfix config to use sasl_passwd file

sudo chmod 400 /etc/postfix/sasl_passwd sudo postmap /etc/postfix/sasl_passwd

Then I validate certificates to avoid running into error. Just running following commands
cat /etc/ssl/certs/Thawte_Premium_Server_CA.pem | sudo tee -a /etc/postfix/cacert.pem

You can reload postfix config for changes to take effect
sudo /etc/init.d/postfix reload

Then to test the SMTP connection you can use the following command to send a test mail
echo "Test mail from postfix" | mail -s "Test Postfix" you@example.com

Note: Gmail’s SMTP server has a limit of 500 emails per day

If it is successfyully sent the mail will arrive in the destination mailbox as well as will be visible in your emails sent mail section.

Now to start with Configuring Nagios to send Notifications to contacts.


For this we need to do the following:


   1.       Create the contacts to be notified 
   2.       Create contact groups to be notified 
   3.       Enable Nagios Notifications
   4.       Define Host and Service notifications
   5.       Restart Nagios
   
   Now lets see how they are done...

   1.       Create the contacts to be notified  
   
   For this you need to edit the contacts.cfg in your Nagios folder and append the contact information of the parties that you want to send notifications of service or host states.you can find the file at

   /usr/local/nagios/etc/objects/contacts.cfg


You can use the template given in the templates.cfg


2.       Create contact groups to be notified

Edit the contacts.cfg  in  nagios/etc/objects
You can use the template given in the templates.cfg


3.       Enable Nagios Notifications


For this you can change the enable_notifications value to true (1) in theNagios main configuration file nagios.cfg.


4.       Define Host and Service notifications

You can change each host/service definition by referring to the template provided for sending notifications to contacts and contact groups.


5.       Restart Nagios

You must restart Nagios for the changes to take effect.


Note: Please change the command definition at commands.cfg for "notify-host-by-email" and "notify-service-by-email". /bin/mail   in to /usr/bin/mailx

dNow that everything is worked out fine you can check the state of your notifications from the Nagios interface Notifications section whether they are being sent or not.


Finding all these was not so easy unless for the generous spirit of the following people who had their ideas shared over the netand I owe a thanks to them as well ! 


http://www.telnetport25.com/2012/02/configuring-e-mail-notifications-in-nagios-core/